


Cotton embroidery floss is a good starting point for traditional knotted friendship bracelets. Choose a pattern first, then check how many working strings it needs and how long to cut them. A flat chevron, a simple braid, and a stretch bracelet with letter beads use string differently.
The confusing part is often the wording. “Six strands” on a floss label and “six strings” in a pattern can mean different things. Add a folded start, and four pieces can become eight working ends before you've tied the first row.
What is friendship bracelet string called?
The thread used for many traditional friendship bracelets is called embroidery floss. Standard stranded floss consists of fine plies gathered into a thicker bundle. You can separate those plies for some kinds of needlework, but bracelet patterns often use the full bundle as one working string.
“Thread” is a broader name. “Cord” usually describes a thicker material or a different construction, while “rope” may describe a finished bracelet's appearance. Those words alone won't tell you whether a particular material suits your pattern.
For colors, start with simple string bracelet ideas in shades you'd actually want to wear. Black and beige, as in the Altiani Friendship Bracelet, give a woven design contrast without using every shade in the thread box. Lay your chosen colors together before committing to the cut lengths.

ALTIANI FRIENDSHIP BRACELET
Which string should you use for friendship bracelets?
The best string for friendship bracelets depends on how you plan to make them. For a first knotted friendship bracelet, use the material specified in the tutorial. That gives you a sensible reference for thickness and cutting length, especially while you're learning to keep the knots even.
Cotton embroidery floss is a familiar option for stripes, chevrons, and other knotted patterns. Check the fiber content on the package, though. Embroidery threads can also contain rayon, polyester, or blends; a familiar-looking skein isn't proof that it's cotton.
Pearl cotton has a different construction. DMC describes its pearl cotton as non-divisible, meaning you use it as a single thread rather than separating it into finer plies. It comes in different thicknesses, so check the size before substituting it for floss.
| Material | Where it fits | What to check |
|---|---|---|
| Cotton embroidery floss | Traditional knotted friendship bracelets | Whether the pattern uses the full bundle or separated plies |
| Pearl cotton | Patterns written for its particular thickness | Thread size and the pattern's material recommendation |
| Craft thread | Bracelet projects that specify that product | Fiber content, construction, and thickness |
| Nylon or polyester cord | Cord-based braids and macramé designs | Cord diameter and instructions for the start and closure |
| Elastic cord | Stretch bracelets with beads | Bead-hole fit and the manufacturer's finishing instructions |
A thicker cord can change the width of a bracelet and the size of its knots. Elastic serves another purpose: it lets a beaded bracelet stretch over the hand. Neither is an automatic substitute for the floss in a flat knotted design. For seed bead patterns with beading thread, check that the bead holes allow several passes with your chosen needle and thread.
For stitched projects, check the needle and thread for beadweaving against the pattern's supply list before substituting either one.
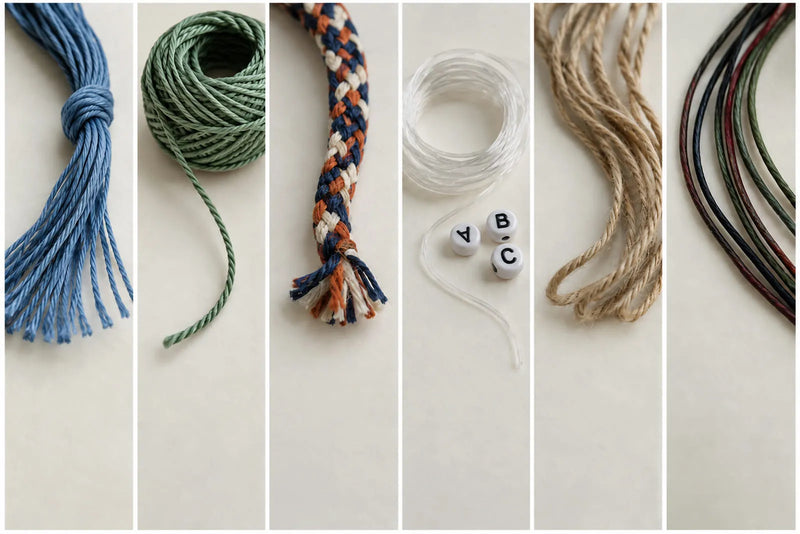
If you haven't settled on a design yet, choose a friendship bracelet pattern before cutting anything. The pattern should guide the material choice, working-string count, and starting arrangement.
Six-strand floss and separate working strings
Plies, strings, and colors
The six plies inside a piece of six-strand embroidery floss are the fine threads that make up that bundle. If your bracelet pattern uses full floss, one length of the bundle counts as one working string.

A three-string friendship bracelet therefore needs three working strings, which may each be a full bundle of floss. It doesn't mean separating three tiny plies from a single piece. A four-string pattern may use two colors repeated twice, four different colors, or another arrangement specified by its instructions.
The three-color zigzag string setup uses two separate pieces of each color, giving you six working strings without folding them.
The Marino Friendship Bracelet pairs blue and white, a two-color reference for planning a palette. A project in those colors might still need four, six, or eight working strings. Keep both the color count and the working-string count in your notes so you don't confuse them when choosing a design.

MARINO FRIENDSHIP BRACELET
Folded pieces and working ends
Folding a piece in half gives you two ends to work with. Four folded pieces give you eight working ends. Whether that's the right start depends on the design and closure.

Write both counts down if the instructions involve folding: pieces to cut and working strings after folding. It's a small note that can prevent you from cutting twice as many pieces as you need.
How much string should you cut?
Use your pattern's cutting instructions whenever they're available. Friendship bracelet string length depends on the knot sequence, the length of the patterned section, and the way you'll finish the ends. A wrist measurement alone doesn't account for all the thread used inside the knots.
A cutting example with folded string
A Beautiful Mess's chevron example with folded floss starts with four differently colored pieces, each about 72 inches (183 cm) long. Folding them creates eight working ends, each nominally 36 inches (91 cm) before the starting loop is formed.
| Preparation detail | Amount in this example |
|---|---|
| Pieces to cut | Four, one in each color |
| Length of each piece | About 72 inches / 183 cm |
| Working ends after folding | Eight |
| Half-length before forming the loop | About 36 inches / 91 cm |
The loop and starting knot use some of that length. More thread goes into the pattern and the finish. The 36-inch measurement describes each folded half, not the finished bracelet or a guaranteed length of usable pattern.
Across all four colors, this example requires about 8 yards (7.3 m) of floss in total. Keep the per-color requirement in mind when checking your supplies; plenty of one color won't make up for a shortage of another.
Allow for the pattern and the finish
Some strings spend more time tying knots while others act mainly as a base. They won't necessarily shorten at the same rate. If the pattern gives different cutting lengths for different strings, keep those differences.
Check the start and closure before cutting, too. A folded loop, braided ties, and an adjustable closure use thread in different ways. Leave room to make and test the finish before trimming the tails. A project using square knots in cotton cord has different cutting allowances from an embroidery-floss pattern.
An arm's-length estimate is hard to repeat, especially if two people are making matching bracelets. Use a ruler or measuring tape and record the cut lengths. If you make the same design again, note how much thread remained and whether you changed the finished length.
Make a cutting note before you begin
Put these details beside your pattern:
- The material and thickness you're using.
- The number of colors, cut pieces, and working strings.
- Whether the pieces stay separate or fold in half.
- The cut length for each piece or color.
- The intended patterned length and type of closure.
Check this note against the tutorial before the scissors come out. It is much easier to correct a count on paper than after the first few rows.

How to prepare string for a friendship bracelet
Lay out the colors in the order the pattern shows. If you're borrowing a palette from a finished bracelet, keep the color choice separate from its construction. The blue, white, and green of the Frazeto Friendship Bracelet can suggest a combination for your own project; your selected pattern still determines how those colors are arranged.

FRAZETO FRIENDSHIP BRACELET
Keep a small space clear for the loose ends. You'll need to see which string comes next without pulling the whole bundle apart each time.
- Read the preparation instructions. Confirm the material, working-string count, and starting method.
- Check the colors. Lay the skeins together and make sure you have enough of each one.
- Measure and cut. Label any pieces that need different lengths. Keep scraps separate from the pieces for the bracelet.
- Set up the start. Follow the pattern's instructions for a loop or gathered end, leaving the specified allowance.
- Arrange and secure the strings. Use tape or a clipboard to hold the start while keeping the working ends accessible.
If the movements are still unfamiliar, practice the four basic knots with spare floss first. Then start the bracelet with the color order in front of you. After the first row, check the string arrangement against the pattern before continuing.
What to check when buying bracelet string
A large color assortment can be tempting, but read the details before choosing it. Look for the fiber content, thread construction, size or diameter, and length per skein or spool. “Bracelet string” on the front of the package doesn't answer those questions.
For a first project, choose enough of the same thread type for all the colors the pattern needs. That removes a thickness difference you would otherwise have to work around. If you're adding beads, check that the holes accommodate the string and any doubled section that must pass through them.
Read the care instructions as well. Cotton, synthetic cord, and elastic have different properties, and a product's care guidance is more useful than assuming every string bracelet tolerates the same treatment.
Once the material and cut lengths are settled, you can give your attention to the pattern. Keep the preparation note nearby, leave the tails long while you work, and check the fit before making the final trim.
Friendship bracelet string FAQs
Should you separate the six strands of embroidery floss?
Follow the pattern. Many traditional bracelet instructions use the full six-ply bundle as one working string. Separating it makes that string finer and can change the bracelet's width. If the tutorial calls for a particular number of plies, prepare those consistently for every relevant piece.
Can you use sewing thread for friendship bracelets?
Ordinary sewing thread is much finer than a full bundle of embroidery floss. A single length won't reproduce the thickness of a floss-based design. It may suit a project written for fine thread, but for a beginner bracelet, matching the tutorial's material makes the preparation easier to follow.
Can you use yarn instead of embroidery floss?
You can use yarn in a design that allows for it, including some braids. Check its thickness and texture against the instructions. A chunky or fuzzy yarn won't produce the same dimensions or clearly defined rows as a pattern made with smooth, finer thread.
Can you mix different types or thicknesses of string?
You can experiment, but test a short section before committing to the full bracelet. Different thicknesses can make the rows uneven or change the width. For a first attempt at a new pattern, using the same thread type across the colors gives you fewer variables to manage.
What can you do if a working string becomes too short?
Pause before it becomes too short to hold. Depending on the design, you may be able to join another piece in the same color and keep the join on the back. Check the knot and finishing instructions for your material. Avoid trimming a join closely before you've confirmed it stays secure.

Save 20%
Coordinated pieces, ready to wear.

Up to 15%
Pick any 3 or 5 bracelets.
From a customer
★★★★★
“Still wearing it two months later.”
Nick Verified · Sicily set


