


Stringing beads means sliding beads onto cord, thread, or flexible beading wire to make a strand. For a bracelet that stretches over your hand, choose jewelry elastic and its recommended knot. For a strand with a clasp, flexible beading wire and matching crimps are a useful starting point. Check the bead holes before buying either: the material has to fit the beads and suit the finish.
The Loreto Seed Bracelet uses 2 mm black seed beads on an adjustable cord. Its narrow row is a useful reminder that a simple strand can be a complete design. You can begin with one bead shape and one color, then concentrate on getting the construction right.

LORETO SEED BRACELET
Look at small beads in finished cord bracelets to compare the spacing and the amount of cord showing. For your own piece, decide how it will open and close before cutting the stringing material.

What should you use for stringing beads?
Choose the material for the project. Elastic, flexible wire, and knotting cord need different endings.
| Material | A useful starting point for | How it is commonly finished | Check first |
|---|---|---|---|
| Jewelry stretch cord | Slip-on beaded bracelets | The cord maker’s recommended knot and, where specified, compatible adhesive | Cord diameter, bead holes, and knot instructions |
| Flexible beading wire | Single-strand bracelets or necklaces with clasps | Compatible crimps attached to a clasp | Wire diameter, crimp size, and crimping tool |
| Silk or suitable nylon knotting cord | Designs with knots between beads | The project’s specified knots and clasp attachments | Cord thickness, knot size, and bead-hole fit |
| Fine beading thread | Small-bead projects and stitched beadwork | The thread path and finishing method in the pattern | Needle fit and the number of passes |
Flexible beading wire contains fine metal strands under a coating. It behaves differently from solid craft wire, which is shaped into loops or wrapped around beads. Memory wire is another material again: it keeps a coil shape and needs its own cutting and finishing tools.
For a first clasped strand, use one manufacturer’s compatible wire, crimps, and tool recommendations. A crimp tube’s outside appearance will not tell you whether it suits your wire. Check the spool or the maker’s chart.

Check the beads before you start
Measure the bead and check its hole separately. “4 mm” usually describes the bead’s outside size; it does not promise a particular hole diameter. If the names on the packets are confusing, compare bead materials and hole shapes before choosing supplies.
Try the stringing material through several beads, including the smallest spacer in the design. If a finishing method sends a tail back through an end bead, test that doubled section too. With a needle, check the eye and threaded portion, not just the point.
Set aside chipped beads and any that scrape or catch the material. Do not solve a blocked hole by forcing a needle or wire through it. Try a compatible finer combination or choose a different bead, then check that the new material still suits the whole project.
Lay out the design on a bead mat or a folded towel. Put the clasp beside it so you remember that the fastening takes up part of the finished length. A few inches of loose beads can look quite different once curved around a wrist.
For colors, make a short sample first. Try a plain row, a small center group, or one accent every few beads. Photograph the arrangement if you want to compare two versions without losing the first.
Stringing beads on wire: a simple clasped strand
This method uses flexible beading wire and ordinary two-stage crimping pliers. Follow the instructions supplied with your particular crimps and tool; specialty crimp systems can work differently.
Gather compatible supplies
You will need beads, flexible beading wire, two matching crimp tubes, suitable crimping pliers, and cutters rated for that wire. Use a lobster clasp with a closed attachment loop and a closed ring for its other end. Optional crimp covers conceal the finished crimps; they do not secure the wire themselves.
Cut enough wire for the intended strand plus several inches of working room at each end. Before using your chosen beads, practice one attachment on scrap wire. Check that the crimp holds under a gentle pull.
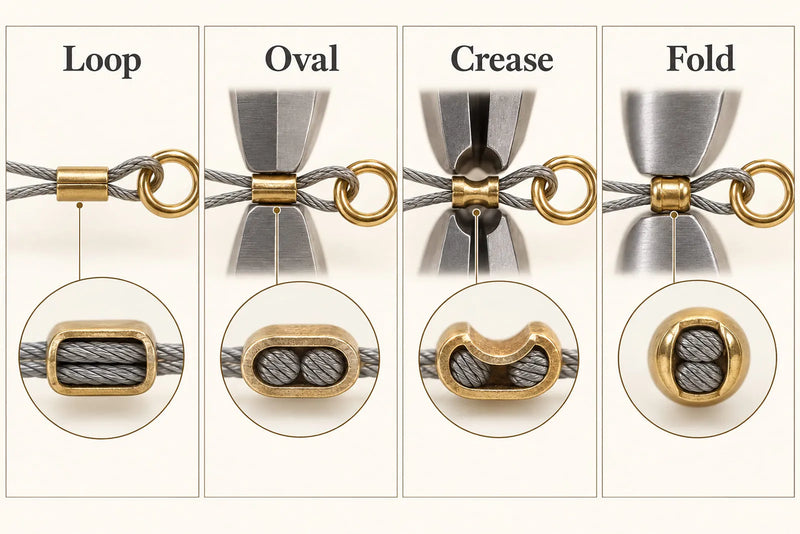
Attach the first end
Slide on a crimp tube and the clasp’s attachment loop, then return the wire through the tube. Keep the two wire sections side by side. Leave the clasp room to pivot.
For Beadalon’s conventional tool, first oval the tube in the outer jaw. Use the inner jaw to form a crease, then turn the crimp 90 degrees and fold it closed in the outer jaw. Follow the illustrated crimping sequence to see the positions.
Check the connection before trimming the tail as directed for your system. Tail handling differs between manufacturers; do not choose wire too fine for your beads simply to hide a doubled tail.
Add the beads and check the arrangement
String your laid-out sequence onto the long wire end. Pause occasionally to check the order. It is easier to remove a misplaced accent now than after closing the second end.
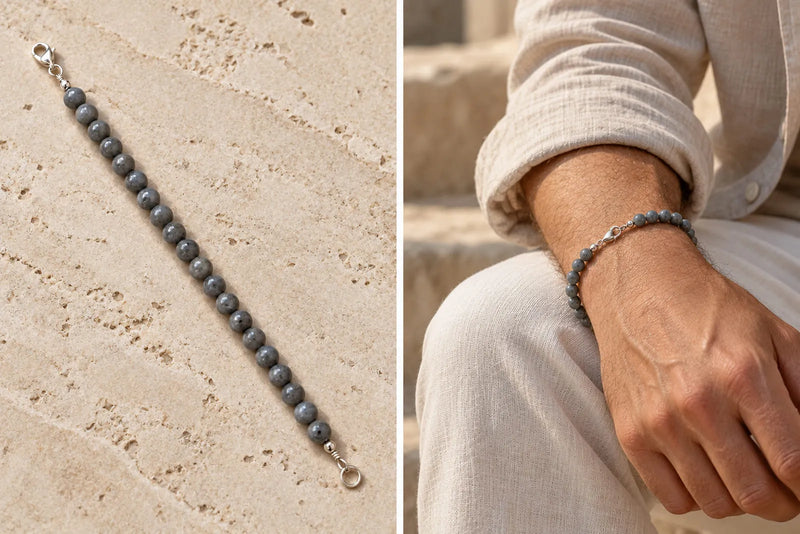
The Paros Picasso Seed Bracelet uses 2 mm Miyuki Picasso-finish seed beads with blue-gray tones and gray cord. The variation within those beads gives a simple row visual detail. When planning your own strand, try a plain arrangement before adding contrasting spacers or a large focal bead.

PAROS PICASSO SEED BRACELET
Close the second end
Add the second crimp and the closed ring. Return the wire through the crimp, then adjust the loop and bead spacing before compressing it.
Curve the strand into its worn shape. The beads should have enough freedom to move without a long bare section of wire. Pulling everything tight can make the strand stiff and strain the wire at the ends. Crimp the second attachment using the same tool sequence, check both connections, and trim as instructed. Add covers only after the crimps hold.
Open and close the clasp several times. Feel for a protruding tail and check that the loops move freely. Fix a slipping crimp or awkward end before wearing the piece.
Stringing crystal beads: check the holes and edges
Read the material description first. “Crystal” can describe manufactured crystal glass or a gemstone such as quartz. It does not identify the material, hole size, or suitable stringing method on its own.
When stringing crystal beads, look closely at the hole openings and test the proposed wire or cord through a few beads. Some drilled edges can abrade the material. A wire manufacturer’s guidance for glass, stone, and abrasive beads is more useful than choosing by the bead’s sparkle or color.
Choose the largest suitable wire diameter that passes through the smallest hole, following the maker’s recommendations for wire diameter and bead abrasion. If that leaves you with a combination the manufacturer does not recommend, change the bead or construction. A bead fitting onto a very fine wire is only one part of the decision.
You can test a short run of faceted beads between plain rounds to compare their shapes and spacing. Hold the sample in a curve and notice where the beads touch. Use intact beads with a stringing method suited to them; adding spacers does not repair a sharp or damaged hole.
Stringing beads for bracelets: allow for the finish
A clasped bracelet, a stretch bracelet, and an adjustable cord bracelet need different constructions. Settle that choice before deciding the final bead count.
For elastic, use jewelry stretch cord that fits the holes and follow its maker’s preparation, knotting, adhesive, and curing instructions. Keep the bracelet relaxed while checking the fit. Avoid substituting a metal crimp for the recommended knot: a finish intended for wire may damage elastic.
If you want a complete practice design, follow a two-color stretch-bracelet project. It includes the bead sequence and finishing steps, so you can work through one method from start to finish.
Cotton embroidery floss has another role in traditional knotted friendship bracelets. Use the pattern’s specified floss for knotted friendship designs rather than assuming it is interchangeable with elastic or flexible wire.
Check the fit with the actual beads
Before fixing the last end, check the length against your wrist. Include the clasp or other closure in that check. A row measured flat is not the same as the space inside the finished bracelet, particularly when you change bead sizes.
The Tiger Eye Bracelet combines natural 4 mm tiger eye beads with an adjustable cord. That bead size offers a different proportion from a row of 2 mm seed beads. When comparing sizes for your own bracelet, curve each sample around your wrist instead of choosing from a flat ruler measurement alone.

TIGER EYE BRACELET
Leave working tails until the fit and fastening are settled. For elastic, check that the bracelet passes over your hand as intended and sits comfortably afterward. For a clasp, check that you can fasten it without pulling the strand tight.
Fix common stringing problems
| What you notice | What to check or change |
|---|---|
| The needle gets stuck halfway through | Test the threaded eye; change the needle/thread combination or bead instead of pushing harder. |
| The wire will not pass through a spacer | Check that spacer’s hole before choosing a finer wire. The replacement still needs to suit the full strand. |
| A wire strand feels rigid | Check for beads packed too tightly and loops that cannot pivot. Adjust before closing the final crimp. |
| A crimp slips | Recheck the crimp size, tool, wire placement, and compression. Replace the failed crimp and inspect the wire. |
| Cord frays beside one bead | Stop and inspect that bead’s hole and the cord. Replace damaged parts and reconsider the combination. |
| The pattern looks uneven | Lay the strand flat and check the sequence, mixed bead dimensions, and spacing before finishing. |
Keep a note of the bead size, stringing material, and finishing components you used. If you change one of them next time, make another short sample. That gives you something concrete to compare before committing the whole strand.
Stringing beads FAQs
Can you use the same method for a necklace?
Yes, flexible-wire stringing with a clasp can also make a necklace. Reassess the wire, bead weight, length, and clasp for that design. A combination chosen for a small bracelet is not automatically suitable for a much longer or heavier strand.
How is stringing different from beadweaving?
In simple stringing, beads follow a strand in sequence. In beadweaving, the thread connects beads into a structure through a particular stitch or thread path. A line of beads and a woven band may use similar components, but they need different instructions.

Save 20%
Coordinated pieces, ready to wear.

Up to 15%
Pick any 3 or 5 bracelets.
From a customer
★★★★★
“Still wearing it two months later.”
Nick Verified · Sicily set


