


A knotted bracelet gets its shape, pattern, or closure from knots tied in cord or thread. To make the flat bracelet in this guide, work alternating halves of a square knot around two straight center cords, then add a separate sliding closure. The band stays flat, and the closure lets you take it off.
Look at the ends as well as the band when comparing braided cord bracelets in different color combinations. A braid may carry the color and pattern, while a small knot at the back does the adjusting. Knowing which part you are looking at makes bracelet instructions much easier to follow.
What are knotted bracelets called?
Friendship bracelet, macramé bracelet, and knotted bead bracelet can all describe bracelets made with knots. They tell you different things about the finished piece.
| Type | What to look for |
|---|---|
| Knotted friendship bracelet | Colored threads worked into a pattern, often using pairs of hitches. |
| Macramé bracelet | Cord knotted into a band, such as the repeated square knots used below. |
| Knotted bead bracelet | Beads separated or held in place by knots in the stringing material. |
| Adjustable cord bracelet | A sliding closure that changes the opening; its band may be knotted, braided, or plain. |
Some knot bracelets use the shape in metal. Kompos Silver Bracelet is an open cuff made from solid 925 sterling silver, with a knot at its center. Here, the knot is a design detail rather than a way to fasten cord.

KOMPOS SILVER BRACELET
Macramé describes a construction technique. Friendship describes how a bracelet is often given or worn. A bracelet can be both.
The project below makes a plain square-knot band. If you want diagonal stripes in embroidery floss, a first candy stripe made with four strings is a more suitable place to start.
Which knots belong where?
Choose knots for the job they need to do. Repeated square knots can form the bracelet's body. A separate square-knot sleeve can make an adjustable closure. An overhand knot at the end of a tail can stop it from slipping through that closure.
Those are three different tasks, even when the same piece of cord runs through the whole bracelet.
A square knot is also different from the forward and backward movements used in many flat friendship patterns. If a pattern has arrows and rows of colored threads, check how the four friendship pattern knots move before following it. The left-right sequence below is for macramé square knots.
What you need for a simple knotted bracelet
Use smooth cotton knotting cord around 1 mm thick, scissors, a ruler, tape or a clipboard, and a blunt finishing needle. You will also need a small amount of fabric adhesive labeled for your cord. Use the same cord for the band and closure on your first attempt.
Check that the needle can pass through the back of a few practice knots with the cord threaded through its eye. Do this before making the whole band. A needle that fits through the loose cord may be too bulky once the knots are snug.
| Cut piece | Starting allowance | Purpose |
|---|---|---|
| Two center cords | 24 inches / 61 cm each | Stay straight inside the band and become the adjustable tails. |
| One working cord | 96 inches / 244 cm | Its two ends tie the band around the center pair. |
| One closure cord | 20 inches / 51 cm | Forms the short sliding sleeve. |
These are starting allowances. Your wrist size, cord thickness, and knot tension affect how much you need. Leave extra cord until you have checked the bracelet over your hand, and make a practice section if you change materials. The guide to choosing thread for a friendship bracelet explains why floss and thicker cord behave differently.
Color changes the look before you change a single knot. Amiore Friendship Bracelet uses red and white in a handwoven nautical-cord braid, with a small sterling silver tag. For this first square-knot project, one cord color makes it easier to concentrate on the shape of each repeat.

AMIORE FRIENDSHIP BRACELET
How to make a knotted bracelet
1. Set up the center and working cords
Lay the two center cords beside each other, with their top ends even. Leave about 5 inches / 13 cm above the starting point, then tape or clip the cords to your work surface. Keep those upper tails free; you will need them later.
 Place the midpoint of the long working cord underneath both center cords. You should see four lengths below the start: a long working end on each side and two straight cords in the middle.
The middle pair stays together. Knot with the outer ends.
2. Make the left-starting half
- Bring the left working end across the front of both center cords, leaving a loop on the left.
- Lay the right working end over the end crossing the front.
- Pass that right end behind both center cords and bring it forward through the loop on the left.
- Pull the working ends outward until the half knot sits neatly around the center pair.
Keep the center cords straight as you tighten. If they bend into a loop, ease the half knot open and straighten them.
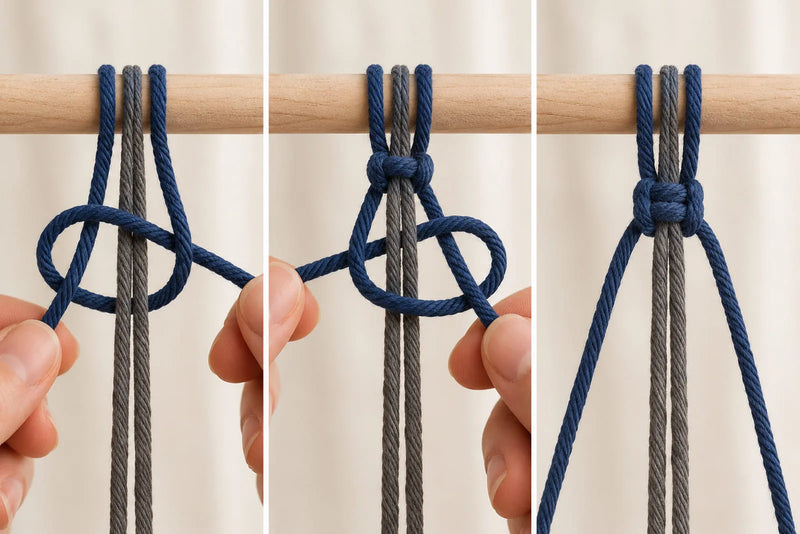
3. Mirror it to finish one square knot
- Bring the working end now on the right across the front of the center pair, leaving a loop on the right.
- Lay the left working end over the end crossing the front.
- Pass that left end behind both center cords and bring it forward through the right-hand loop.
- Tighten evenly.
Those two opposing halves make one complete square knot. Left and right refer to where the free ends are sitting now, not to a permanent name for either end.
4. Build the band
Repeat the pair: left-starting half, right-starting half. After each full knot, guide it up against the previous one before snugging the ends.
Check a short section on the table. If it is beginning to spiral, you may have repeated the same starting side. Undo that section while the knots are still accessible. Pulling harder will not turn a spiral into a flat band.
Hold the growing band around your wrist occasionally. Leave a gap for the sliding sleeve, roughly 1/2 inch / 13 mm as a starting allowance, then check it against the closure you actually make. Stop before the working ends become too short to finish with a needle.
5. Secure the working ends
Finish on a complete square knot and turn the band over. Thread one working end onto the needle and weave it back through the rear of three or four completed knots. Repeat with the other working end, leaving both center cords intact.
Apply a small amount of compatible fabric adhesive to the tucked working ends, following its directions. Let it dry fully before trimming. The center cords must remain free: cutting them would remove the tails needed for adjustment.
Add the sliding closure and finish the ends
Castel Friendship Bracelet pairs a green and white handwoven braid with a sliding cord closure. The part to notice here is the adjustment: the cord ends move through the closure, letting the opening change without untying the band.

CASTEL FRIENDSHIP BRACELET
Curve the band into a circle with its front facing outward. Overlap the two pairs of center-cord tails so they point in opposite directions. You now have four straight tails passing through the closure area.
Hold the overlap with loose temporary ties outside that area. Center the separate closure cord underneath all four tails.
Use its two ends to tie the same alternating halves around the bundle. Begin with three complete square knots. Test whether the tail pairs can slide through the sleeve before adding more. A longer sleeve is not automatically a better closure.
If the cord path is hard to picture, Make and Fable's photos of a square-knot sliding sleeve show how a separate cord surrounds the moving ends.
Weave the closure's working ends back through its own outer knotwork. Do not catch the four straight tails with the needle. Secure only the tucked sleeve ends with a small amount of compatible adhesive, keeping it away from the moving tails. Let it dry as directed, test the slide again, and trim the excess working cord.
Remove the temporary ties. Open the bracelet wide enough to pass over your hand. With that opening preserved, tie the two cords in each tail pair together in an overhand stopper knot outside the sleeve. Check that the stoppers cannot pull through it.
Only then trim the tails, leaving a little cord beyond each stopper. Open and close the bracelet several times and gently tug the finished ends. If a tucked end moves or a stopper slips through, redo it before wearing.
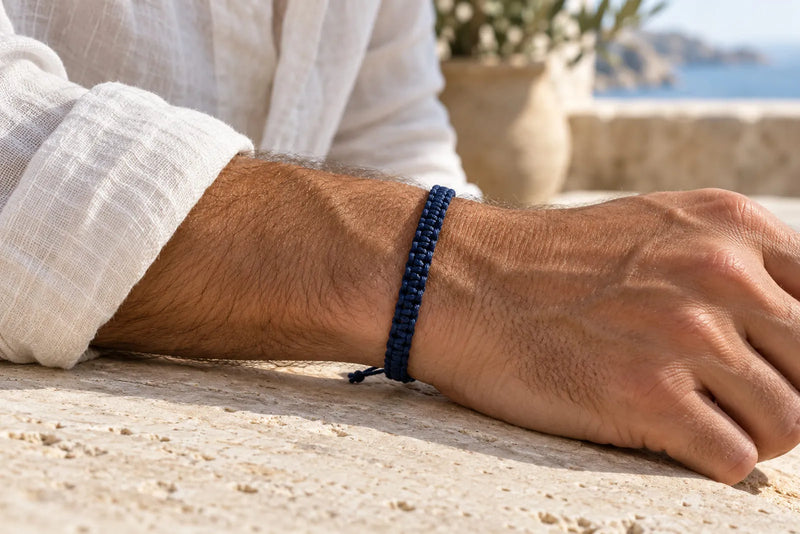
How to wear a knot bracelet?
Loosen the closure until the bracelet passes over the widest part of your hand. Set it around your wrist, then pull the free tail pairs gradually to reduce the opening. The band should feel secure without pinching when you bend your wrist.
To remove your bracelet, ease the opening wider again. Avoid dragging a tight band over your knuckles. If a tail catches under a watch strap or against your sleeve, check its length while keeping enough travel for removal.
Try the finished bracelet alone first. You can see whether the band lies flat and feel whether the closure presses against the underside of your wrist. When choosing a second bracelet, repeating one color is an easy way to connect the two. Different thread patterns change the effect, too; compare what changes from chevrons to waves when you are ready for a different project.
For purchased bracelets, follow the care instructions for the entire piece, including its cord, beads, and metal details. Do not assume that an adjustable closure makes a bracelet suitable for swimming or showering.

Fix twisting, gaps, and slipping ends
| Problem | What to check |
|---|---|
| The band spirals | Check that you alternate the starting side for each half. Undo the affected section and restart the pair. |
| One edge is loose | Keep both center cords straight and tighten the working ends evenly. |
| Gaps appear between repeats | Move each completed knot beside the previous one before tightening. |
| The closure sticks | Look for crossed tails, tight sleeve knots, adhesive, or a finishing stitch caught around a tail. Retie the sleeve if needed. |
| A stopper pulls through | Make a larger stopper and recheck the opening over your hand before trimming. |
| A tucked end works loose | Remove the bracelet and redo the finish with enough cord to secure it. |
Knotted bracelet FAQs
What is the significance of a knot bracelet?
A knot bracelet can mark a friendship, a relationship, or a memory shared with the person who gave it to you. You can also wear one simply because you like the cord and pattern. Specific cultural designs may carry their own meanings; a plain knotted band does not have one universal interpretation.
How to do a knotted bracelet?
For this design, keep two center cords straight and tie alternating halves of a square knot around them with the outer working ends. Repeat to build the band. Finish it with a separate square-knot sleeve around the overlapping tails, then add stopper knots after checking the opening over your hand.
What knot is best for bracelets?
Choose it for the material and the task. Square knots suit the flat macramé band shown here; paired hitches form many traditional friendship patterns. A sliding closure needs to move, while an end stopper needs to block an opening. Elastic bead bracelets need finishing instructions suited to the particular elastic.
What is the strongest knot for a bracelet?
There is no single strongest knot for every bracelet. Cord material, diameter, knot shape, and finishing all affect how securely it holds. Check the cord maker's recommendations, practice the intended finish, and test it before trimming. Adding extra knots will not fix a knot that is unsuitable for the material.
What does double knotted bracelet mean?
The phrase is ambiguous. It might describe two knots at the ends, two sliding closures, or repeated knots in the band. It does not tell you exactly how to make or fasten the bracelet. Look for instructions that name the knot and show which cords move through it.
Can I make a knotted bracelet with beads?
Yes, but choose the cord and beads together. The cord must pass through the bead holes, and the knots must be large enough to keep the beads where you want them. A knotted bead bracelet is a different project from the plain band above, so it needs its own spacing and finishing checks.

Save 20%
Coordinated pieces, ready to wear.

Up to 15%
Pick any 3 or 5 bracelets.
From a customer
★★★★★
“Still wearing it two months later.”
Nick Verified · Sicily set


