


To make a simple sliding-knot bracelet, overlap the cord ends and tie each end around the opposite standing cord. The two knots slide to change the opening. For a single central closure, tie a short sleeve of square knots around both overlapping tails with a separate piece of cord.
You can see how a braid and its fastening work together in cord bracelets with adjustable fastening. CASTEL FRIENDSHIP BRACELET has a green-and-white nautical-cord braid and a sliding closure. Its patterned band stays intact while the ends move through the fastening.

CASTEL FRIENDSHIP BRACELET
Choose your sliding-knot closure
| Closure | What you tie | Where it works |
|---|---|---|
| Two simple sliders | Each end makes an overhand knot around the opposite cord. | A plain cord bracelet with enough length at both ends. |
| Square-knot sleeve | A separate cord makes a short knotted band around the overlapping tails. | A cord bracelet or braided tails that can pass through the sleeve. |
Both close a bracelet without a metal clasp. If you also want to make a flat band made with square knots, finish that band before adding its closure.
Prepare the cord and leave room for your hand
Gather knotting cord, scissors, a ruler and tape or a clipboard. Smooth cord around 1 to 2 mm thick gives you a manageable practice piece. Test its grip before committing to the finished bracelet.
For the square sleeve, have a blunt finishing needle ready and a cord-compatible adhesive if needed. Check that the threaded needle can pass through the back of a practice sleeve without catching its straight core tails.
Allow extra length for the knots, overlapping section and ends. A bracelet that fits your wrist must also open over the widest part of your hand.
Method 1: Tie two simple sliding knots
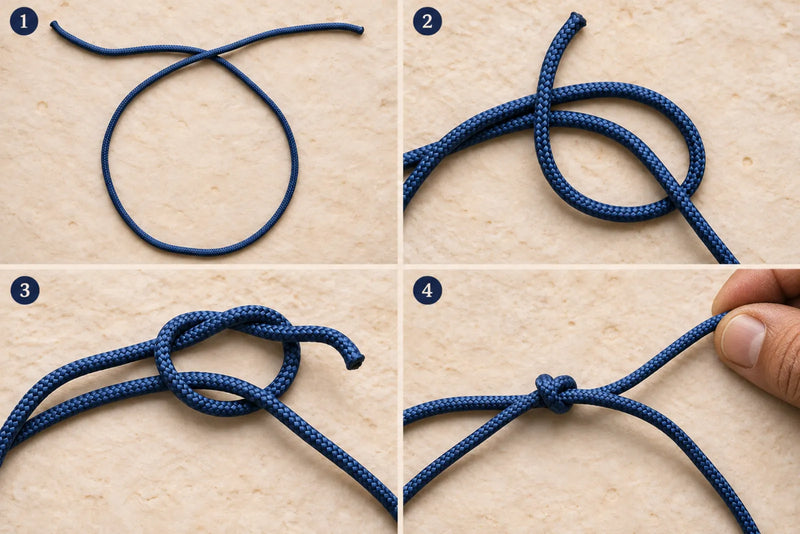
Each slider has one overhand knot, with the other bracelet cord passing through it.
For a striped or chevron band, use the four knots used in friendship patterns to make the band before adding its closure.
1. Overlap the ends
Curve the cord into a bracelet circle. Lay the ends across each other so they point in opposite directions. Leave enough free cord at each end to form a loop.
2. Wrap one end around the opposite cord
Choose one free end as your working end. Bring it over, behind and around the opposite standing cord. Hold the resulting loop open with your fingers.
The standing cord is the length running back toward the bracelet. Keep it straight while the working end makes the knot.
3. Pass the end through its loop
Feed the working tip through the loop you just made. Ease it into a small overhand knot around the standing cord. This version needs one loop; adding several wraps makes a different slider.
4. Snug it and test the slide
Pull the working end gently until the knot holds its shape. Hold the knot between your fingers and check that the opposite cord still moves through it. Ease the knot open and retie it if it jams.
5. Make the second knot
Set the bracelet's opening large enough to pass over your hand. Leave the first knot in place while you tie the other free end around the remaining standing cord.
If the second side feels unfamiliar, turn the bracelet over so its loose end faces the same way as the first. Repeat the same loop-and-thread movement.
6. Adjust before trimming
Move the two knots closer together to enlarge the opening. Slide them farther apart to shorten it. Check both movements with the bracelet off your wrist first, and leave the ends long until you add the stoppers.
SOLARO FRIENDSHIP BRACELET uses an orange-and-white braid with a sliding closure. The braid carries the color; the closing cords provide the adjustment. On a handmade version, keep those tails accessible when deciding where the patterned band should end.

SOLARO FRIENDSHIP BRACELET
Method 2: Make a square-knot slider
This method uses two straight bracelet tails as the core and a separate cord to tie around them.
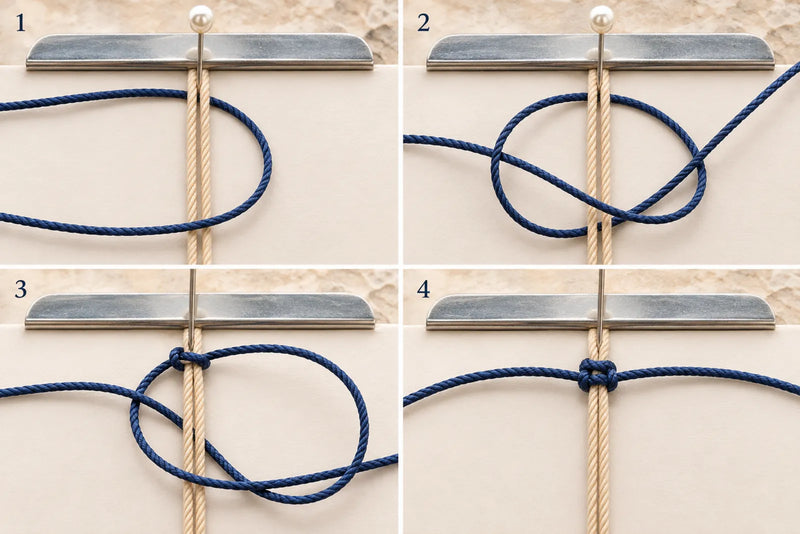
1. Set up the core and working cord
Overlap the bracelet tails in opposite directions and tape them down outside the closure area. Center the separate working cord underneath both tails. Its two ends sit to the left and right.
2. Make the left-starting half
Bring the left working end over both core tails, leaving a loop on the left. Lay the right working end over the end crossing the front. Take that right end behind both core tails, then forward through the left loop.
Pull the two working ends outward to snug the half knot. Keep the core tails straight.
3. Mirror it to complete the square knot
Start from the right this time: bring the right working end across the front, leaving a right-hand loop. Pass the left working end over it, behind both core tails and forward through that right loop.
Tighten evenly. These two opposing halves make one complete square knot.
4. Build a short sleeve
Continue alternating the starting side. Begin with three complete square knots, then test whether both bracelet tails move through the sleeve. Add another complete knot only if the sleeve needs more length.
5. Secure only the working ends
For a cord-compatible finish, tuck the working ends back through the sleeve's outer knotwork with a blunt needle. Keep the straight core tails free. If using adhesive, follow its directions and apply it only to the tucked working ends. Let it dry before trimming and testing again.
Finish the ends and check the fit
Open the bracelet over your hand before tying the final stoppers. Place an overhand stopper near each free tail end and check that it cannot pull through the closure.
VARENA FRIENDSHIP BRACELET has a red, black and white braid with a black sliding knot. When adjusting a finished cord bracelet, make small movements until the band sits securely without pressing into your wrist.

VARENA FRIENDSHIP BRACELET
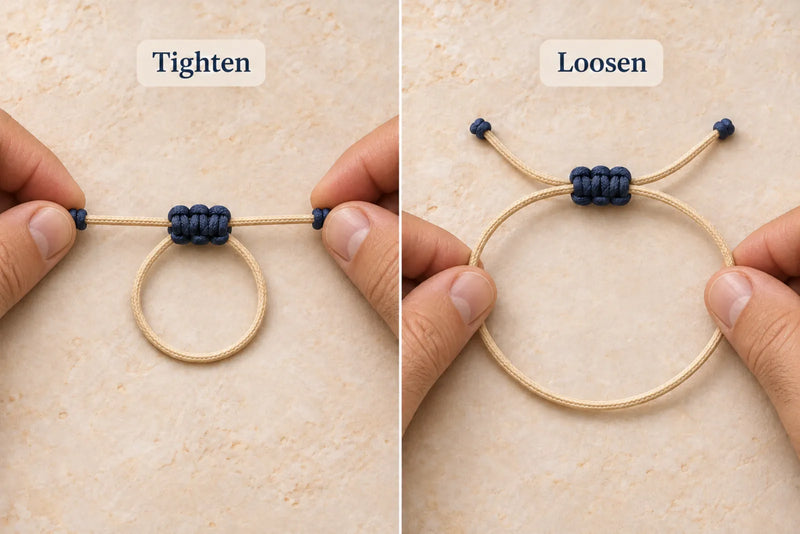
On the square sleeve, pull the two free tails outward to tighten the bracelet. To loosen it, ease the bracelet's sides apart while letting the tails feed back through the sleeve.
Trim only after checking the full opening again. Choose an end treatment suited to the cord: natural fibers need a compatible finish, while heat sealing is an option only for suitable synthetic cord. Keep any adhesive away from the moving strands.
Fix a sliding knot that sticks or slips
| Problem | Check and correction |
|---|---|
| The closure will not move | Look for crossed tails, excessive tension or adhesive on a moving strand. Retie the affected knot or sleeve. |
| It loosens by itself | Check the knot path and tension. Try the closure on a practice piece before changing cord. |
| The square sleeve spirals | You may have repeated the same starting side. Undo that section and alternate left and right. |
| An end pulls through | Make a larger stopper, then recheck the opening over your hand. |
| The opening is too small | Retie with more cord available. Trimming the tails further cannot add adjustment room. |
FAQs
Is a sliding knot the same as a slip knot?
Names vary between tutorials. Here, each simple slider is an overhand knot around another cord; the square slider is a sleeve around two tails. Follow the cord path described above when comparing methods.
Can I add beads?
Yes. Thread the beads before making the closure, check that the cord fits their holes and keep them clear of the moving section. Beads on the ends must also stay outside the slider.
Are these the four friendship bracelet knots?
Many flat designs use the four knots used in friendship patterns to build rows in a patterned band. The closures above adjust its opening. Learn the pattern movements separately if you want stripes or chevrons.

Save 20%
Coordinated pieces, ready to wear.

Up to 15%
Pick any 3 or 5 bracelets.
From a customer
★★★★★
“Still wearing it two months later.”
Nick Verified · Sicily set


